DaVinci Resolve 20: A Video Editor’s Guide to the New Chroma Warp Tool
- Roland dev
- Apr 11
- 3 min read
Updated: Apr 12

As a London-based video editor, I’m always searching for tools that combine speed, control, and quality — and DaVinci Resolve 20’s new Chroma Warp tool delivers on all three. Designed as a powerful alternative to the older Colour Warper, it gives you intuitive, mesh-based control over hue and saturation with pinpoint accuracy.
In this post, I’ll guide you through how Chroma Warp works, why it’s quickly become a go-to tool in my workflow, and how you can use it to refine your colour grading in everything from corporate films to branded social content.
How to Use the Chroma Warp Tool in DaVinci Resolve 20
Open the Colour page in DaVinci Resolve 20.
Create a new node where you want to apply the chroma warp.

In the node settings, locate the color warper tools. You will find the new chroma warp tool alongside the older hue saturation color warper and chroma luma warper . Select the chroma warp tool to open its interface.

Isolating Colours with Chroma Warp in Resolve 20
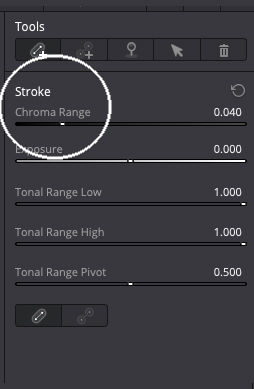
Ensure the "Add stroke normal mode" is selected in the chroma warp interface.
Click and drag on the specific colour or hue you want to adjust directly in the clip viewer.
You will see the selected hue appear as a point in the window within the chroma warp interface
A red circle will also appear around this point on the mesh, indicating the chroma range of the selected hue.
You can now click and drag the point on the mesh to shift the selected hue to a different colour Be aware that using this mode might also affect other hues along a line on the mesh .
If you continue to click on other area of the image these will form part of the selection.

How to Adjust the Chroma Range for Precision Colour Control
In the chroma warp interface, locate the "chroma range" controls.
You can expand the chroma range to select a wider range of similar colours.
You can also make it smaller to narrow the selection to a more specific range .
You can move the chroma range to target slightly different hues.
Targeting Multiple Hues for Advanced Colour Grading in Resolve 20
With "Add stroke normal mode" selected, you can select multiple distinct hues in the clip by clicking and dragging on each desired colour.
Each selected hue will appear as a separate point on the mesh in the chroma warp interface.

Refining Colour Adjustments with Chroma Warp’s Pinpoint Tool
If you used the normal mode and inadvertently shifted other hues, select the "Add pinpoint" tool.
Click on the points on the mesh that represent the hues you want to deselect or bring back to their original colour. This tool helps to refine your selection by removing unwanted affected hues. You can also use it directly on the clip.
By following these steps, you can utilise the new chroma warp tool in DaVinci Resolve 20 to intuitively and precisely select and adjust specific hues in your footage . The tool offers a cleaner interface and more control compared to the older colour warper.
Final Thoughts: Is DaVinci Resolve Chroma Warp good?
If you’re a video editor looking for more control without adding complexity, Chroma Warp is a tool worth mastering. It replaces guesswork with accuracy and gives you a clean, visual way to manage colours across your entire frame.
Whether you're working on music promos, interviews, or commercial content, this feature can help you achieve looks that are consistent, stylised, or subtle — whatever the project demands.
Have questions about colour grading or need help with your edit?
Feel free to get in touch — I offer professional video editing services in London, from multi-cam shoots to post-production and finishing.

Comments